

Operation-Manual-LST700
Application
- Solid Waste Landfills
- Sewage Treatment
- Anti-seepage Project
- Chemical Mining
- Water Conservancy
- Aquaculture
Precautions
Unplug the welder before disassembling it to avoid of being hurt by exposed wires or component inside the machine with power

Incorrect operation may cause fire and explosion hazard because of high temperature, especially near combustible materials and explosive gases.
Don’t touch heater tube and nozzle when they are hot. They may cause burns. Don’t let hot air nozzle go towards people or animals

The power supply voltage must match the rated voltage marked on the welding machine and be reliably grounded. Connect the welding machine to a socket with a protective ground conductor.

To ensure operator safety and reliable operation of equipment, the power supply must be installed power supply and leakage protection at the construction site.

The welding machine must be operated under the correct control of the operator, otherwise it may cause combustion or explosion due to hightemperature.

It is strictly forbidden to use the welding machine in water or muddy ground, avoid soaking, rain or damp.
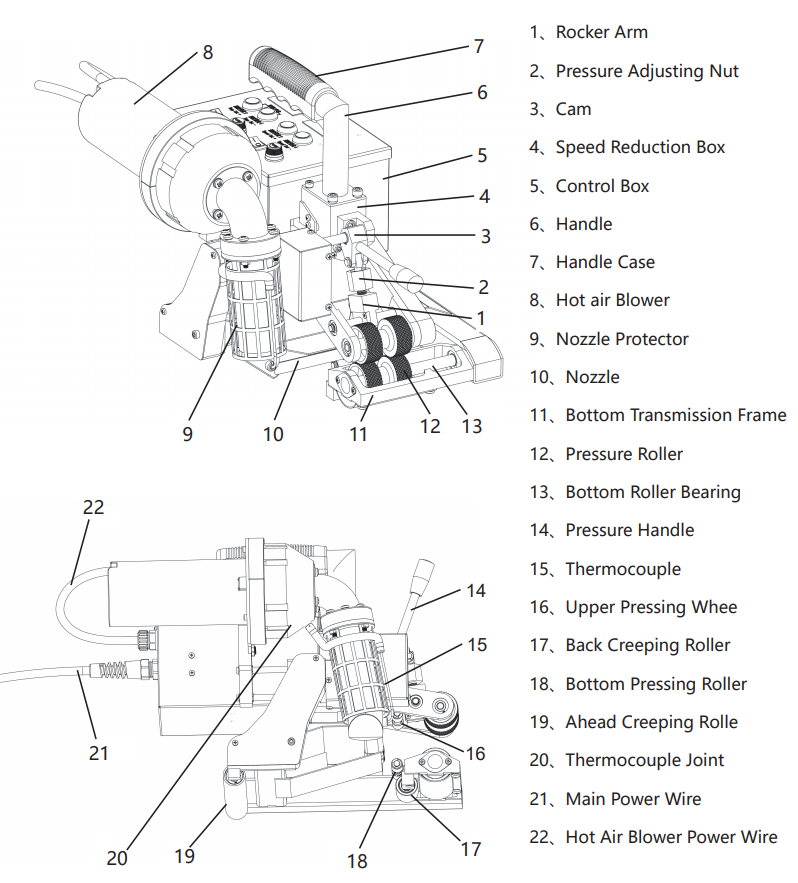
Main Parts
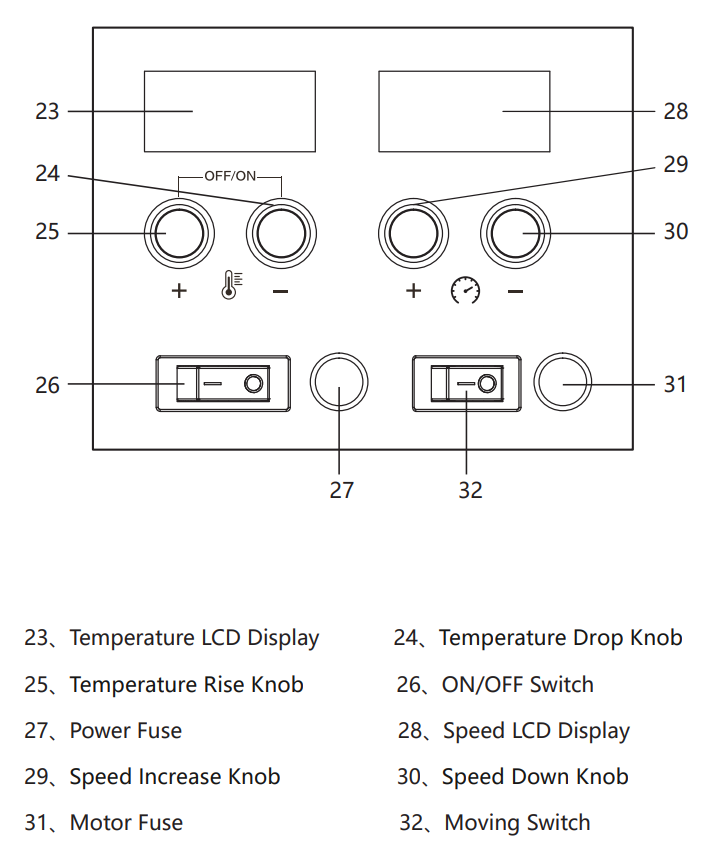
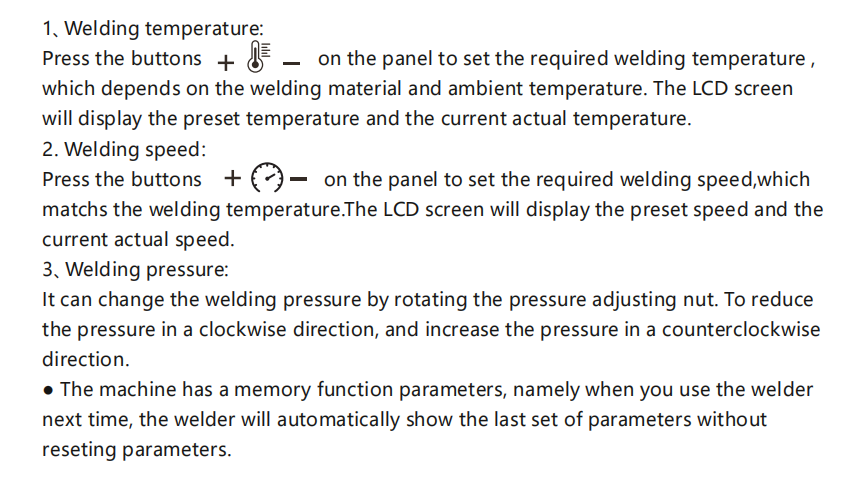
LST700 Control Panel
LST700 Operations
1、Please lift the pressure handle (14) to separate the upper and down pressure roller (12), switch the power on.
2、Setting the welding parameters according to the data of welding test.
3、Please wait the actual temperature value reaching the setting value.
4、Put the welder at the welding position and put the two films (one up and the other one down) into the machine.
5、Press down the pressure handle (14) to make the upper and down pressure roller (12) fit completely. Then turn on the moving switch (31), the machine starts walking and welding automatically.
6、To observe the relative position of the welding seam and the edge of the welded membrane at any time. It must be promptly corrected if there is deviation.
7、When the welder finish welding job,its pressures handle needs to be lifted to separate the upper and down pressure roller in time.
8、After completion of the welding work, press the buttons (24) and (25) on the panel to make the hot air blower in a cold blowing condition in order to cool the nozzle.
9、Power off.
LST700 Parameters Setting
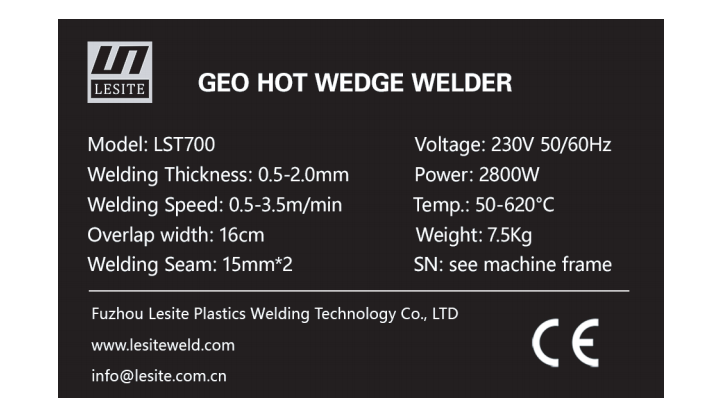
LST700 Parameter
|
Model
|
LST700
|
|
Voltage
|
230 / 120 V
|
|
Frequency
|
50 / 60 Hz
|
|
power
|
2800 / 2200 W
|
|
Temperature
|
50~620 ℃
|
|
Welding Speed
|
0.5~3.5 m/min
|
|
Thickness Of Materials
|
0.5~2.0 mm (single layer thickness)
|
|
Welding Width
|
15mm×2 cavity 15mm
|
|
Overlap Width
|
160 mm
|
|
Seam Strength
|
≥85% parent material
|
|
Weight
|
7.5Kg
|
|
Size( L*W*H)
|
352×267×267 mm
|
LST700 Nameplate
The model identification and serial number identification are marked onthe nameplate of the machine you choose.
Please provide these data when consulting Lesite Sales and Service Center.
LST700 Boot Steps
1、ON/OFF switch (27) is used for turning on the main power of the welder.
2、Turn on ON/OFF switch (27), LCD display shows as Fig 1,the hot air blowerblows cold air without heating.

3、Press the button (25) and(24), the screen shows as Figure 2 and the hot air blowerstarts to heat until reach the setting temperature.

4、lf press the bottoms (25) and (24) at the same time, LCD display shows as Fig 1,the hot air blower blows cold air without heating.
5、When the welding nozzle is at the right position, press the moving switch (31) andthe welder starts to move and weld.lt will stop move if you press the movingswitch again.
6、When the welder starts to move, the LCD display shows as Fig 3.

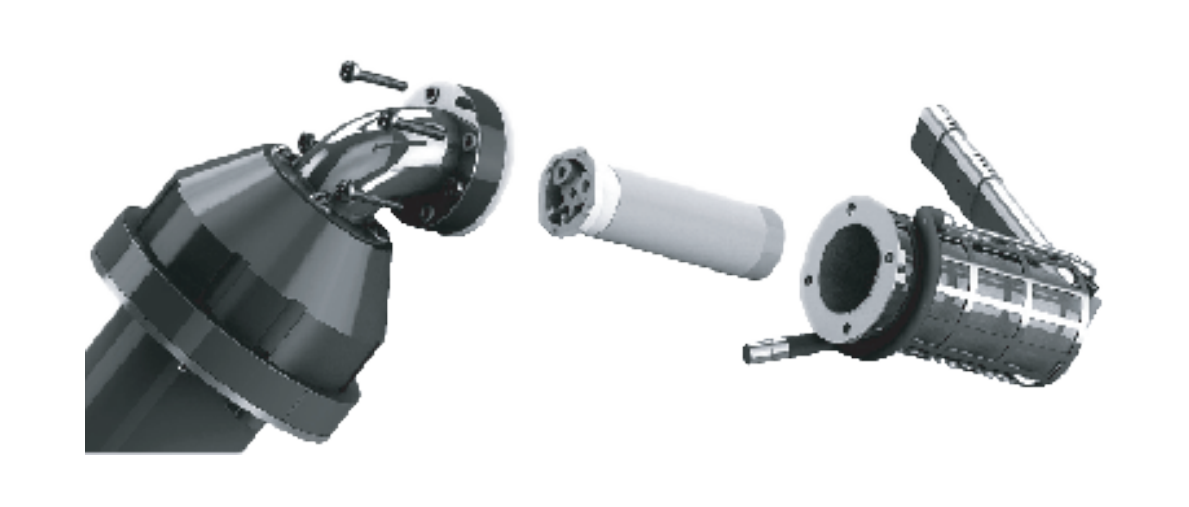
Parts Replacement
1、Replacement of heating element:
Unplug the thermocouple connector ,Loosen the four fixing screws of nozzle.Then you can remove the heating element after removing the nozzle As shown onthe right:
2、Replacement of thermocouple:
Unplug the thermocouple connector ,loosen the fixing wire in the nozzle protector,then thermocouple can be removed.
Fault Diagnosis And Solved Ways
|
Fault
|
Caused
|
Solutions
|
|
Motor cannot
work
|
No power
|
Check the power and connect it
|
|
Fuse burns
|
Replace new fuse
|
|
|
Speed control board burns
|
Replace new control board
|
|
|
Motor burns
|
Replace new motor
|
Routine Maintenance
Quality Assurance
Repairs and Spare Parts


