

Plastic Extrusion Welder
Application
Used for welding thermoplastic materials PE and PP (sheet + film material) in the
following fields:
Container Fabrication Piping Fabrication
Electroplating Anti-corrosion Equipment Landfill
Repair of Geomembrane Environmental Protection Equipment
Precautions
Product Series

Please confirm that the machine is turned off and unplugged
before disassembling the welding machine so as not to be
injured by live wires or components inside the machine.

The welding machine generates high temperature and high
heat, which may cause fire or explosion when used incorrectly,
especially when it is close to combustible materials or explosive gas.

Please do not touch the air duct and nozzle(during welding work or
when the welding machine has not completely cooled down),
and do not face the nozzle to avoid burns.

The power supply voltage must match the rated voltage
marked on the welding machine and be reliably grounded. Connect
the welding machine to a socket with a protective ground conductor.

In order to ensure the safety of the operators and the reliable
operation of the equipment, the power supply at the construction site
must be equipped with a regulated power supply and a leakage protector.

The welding machine must be operated under the correct control of the
operator, otherwise it may cause combustion or explosion due to
high temperature.

It is strictly forbidden to use the welding machine in water or muddy
ground, avoid soaking, rain or damp.


Dual Heating Extrusion Welder Parameter
Dual Heating Extrusion Welder Parameter
| Model | LST600A | LST600B |
|---|---|---|
| Rated Voltage | 230 V | 230 V |
| Frequency | 50 / 60 Hz | 50 / 60 Hz |
| Extruding Motor Power | 800 W | 800 W |
| Hot Air Power | 1600 W | 3400 W |
| Welding Rod Heating Power | 800 W | 800 W |
| Hot Air Temperature | 20 - 620℃ | 20 - 620℃ |
| Plastic Extruding Temperature | 50 - 380℃ | 50 - 380℃ |
| Extruding Volume | 2.0-2.5 Kg/h | 2.0-2.5 Kg/h |
| Welding Rod Diameter | φ3.0-4.0mm | φ3.0-4.0mm |
| Net Weight | 6.9 Kg | 6.9 Kg |
| Driving Motor | HIKOKI | HIKOKI |
| Digital Display | Extruding Temperature | Extruding Temperature |
| Trouble Display | Code Warning | Code Warning |
| Certificate | CE | CE |
| Warranty | 1 year | 1 year |
| Model | LST600C | |
| Rated Voltage | 230 V | |
| Frequency | 50 / 60 Hz | |
| Extruding Motor Power | 800 W | |
| Hot Air Power | 1600 W | |
| Welding Rod Heating Power | 800 W | |
| Hot Air Temperature | 20 - 620℃ | |
| Plastic Extruding Temperature | 50 - 380℃ | |
| Extruding Volume | 2.0-2.5 Kg/h | |
| Welding Rod Diameter | φ3.0-4.0mm | |
| Net Weight | 6.9 Kg | |
| Driving Motor | HIKOKI | |
| Digital Display | Extruding Temperature | |
| Trouble Display | Code Warning | |
| Certificate | CE | |
| Warranty | 1 year |
| Model | LST610A | LST610B |
|---|---|---|
| Rated Voltage | 230 V | 230 V |
| Frequency | 50 / 60 Hz | 50 / 60 Hz |
| Extruding Motor Power | 1300 W | 1300 W |
| Hot Air Power | 1600 W | 3400 W |
| Welding Rod Heating Power | 800 W | 800 W |
| Hot Air Temperature | 20 - 620℃ | 20 - 620℃ |
| Plastic Extruding Temperature | 50 - 380℃ | 50 - 380℃ |
| Extruding Volume | 2.0-3.0 Kg/h | 2.0-3.0 Kg/h |
| Welding Rod Diameter | φ3.0-4.0mm | φ3.0-4.0mm |
| Net Weight | 7.2 Kg | 7.2 Kg |
| Driving Motor | METABO | METABO |
| Digital Display | Extruding Temperature | Extruding Temperature |
| Trouble Display | Code Warning | Code Warning |
| Certificate | CE | CE |
| Warranty | 1 year | 1 year |
| Model | LST610C | |
| Rated Voltage | 230 V | |
| Frequency | 50 / 60 Hz | |
| Extruding Motor Power | 1300 W | |
| Hot Air Power | 1600 W | |
| Welding Rod Heating Power | 800 W | |
| Hot Air Temperature | 20 - 620℃ | |
| Plastic Extruding Temperature | 50 - 380℃ | |
| Extruding Volume | 2.0-3.0 Kg/h | |
| Welding Rod Diameter | φ3.0-4.0mm | |
| Net Weight | 7.2 Kg | |
| Driving Motor | METABO | |
| Digital Display | Extruding Temperature | |
| Trouble Display | Code Warning | |
| Certificate | CE | |
| Warranty | 1 year |
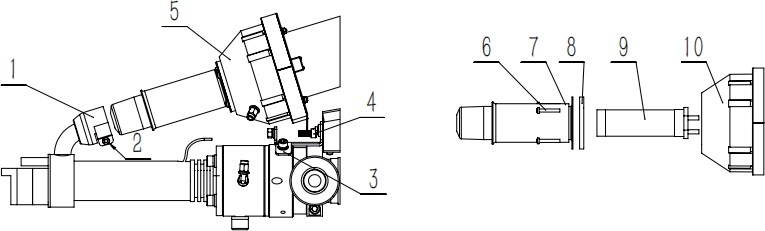
Main Parts
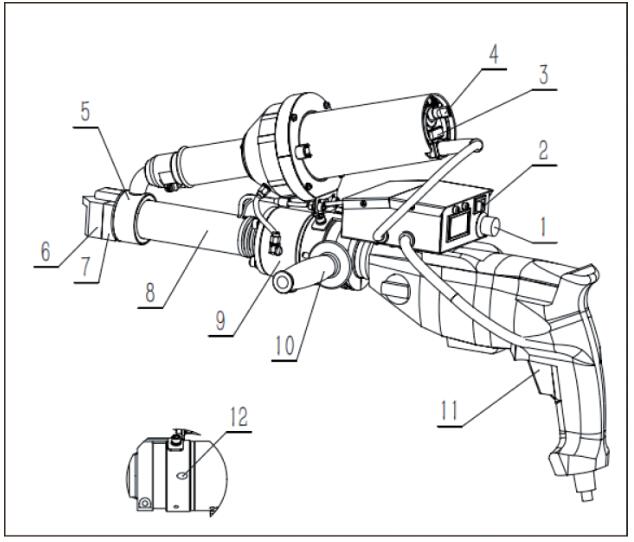
1、Control Box Temperature Adjust Knob 2、Control Box Power Switch
3、Hot Air Blower Power Switch 4、Hot Air Blower Potentiometer
5、Hot Air Scooper 6、Welding Shoe
7、Welding Shoe Aluminum Base 8、Temperature Storage Tube
9、Flange 10、Handle
11、Drive Motor Switch 12、Welding Rod Feeding Inlet
Dual Heating Extrusion Welder Operating steps
◆ Power on
1、Plug in
2、Press the control box power switch and rotate the control box temperature adjust knob
to 320-350℃ (Digital Display)
3、When the digital display temperature reaches setting temperature, delay 180
seconds before starting the drive motor (cold start protection)
◆ Preparation before welding
1、Turn on the hot air blower power switch, rotate the hot air blower potentiometer to
position 6-7
2、Clean the welding rod surface and insert it into the feeding inlet
3、Press the drive motor switch ( short contact 2-3 seconds). After repeating 2-3 times,
confirm the sound of the drive motor is normal and the speed of welding
rod extrusion is smooth(Extend the heating time if the sound is abnormal or welding rod
is not extruded)
4、The extruded welding rod is not soft or hard, and the smooth surface luster is the
best extruding effect
6、Start Welding
◆ Notes for welding process
1、If the sound of the drive motor suddenly changes or the welding rod is stuck without
feeding, it is necessary to immediately loosen the drive motor switch and check whether
the heating temperature is normal
2、In the case of no welding rod feeding in, immediately release the drive motor switch.
Do not start the drive motor without welding rod
◆ Turn off steps
1、The plastic in the extruder must be cleaned before the machine is turned off so as not to
cause blockage and damage the extruder next time
2、After cleaning plastic, set the hot air blower potentiometer to 0 and cool it down
3、Turn off the hot air blower power switch
4、Turn off the control box power switch
5、Cut off the power


| Model | LST600E | LST600F |
| Rated Voltage | 230 V | 230 V |
| Frequency | 50 / 60 Hz | 50 / 60 Hz |
| Extruding Motor Power | 800 W | 1200 W |
| Hot Air Power | 3400 W | 3400 W |
| Welding Rod Heating Power | / |
/ |
| Hot Air Temperature | 20 - 620℃ | 20 - 620℃ |
| Plastic Extruding Temperature | / |
/ |
| Extruding Volume | 2.0-2.5 Kg/h | 2.5-3.0 Kg/h |
| Welding Rod Diameter | φ3.0-4.0 mm | φ3.0-4.0 mm |
| Net Weight | 6.0 Kg | 7.5 Kg |
| Driving Motor | HIKOKI | FEIJI |
| Certificate | CE | CE |
| Warranty | 1 year | 1 year |
| Model | LST610E |
| Rated Voltage | 230 V |
| Frequency | 50 / 60 Hz |
| Extruding Motor Power | 1300 W |
| Hot Air Power | 3400 W |
| Welding Rod Heating Power | / |
| Hot Air Temperature | 20 - 620℃ |
| Plastic Extruding Temperature | / |
| Extruding Volume | 2.5-3.0 Kg/h |
| Welding Rod Diameter | φ3.0-4.0 mm |
| Net Weight | 6.3 Kg |
| Driving Motor | METABO |
| Motor Overload Protection | Default |
| Certificate | CE |
| Warranty | 1 year |
Single Heating Extrusion Welder Parameter
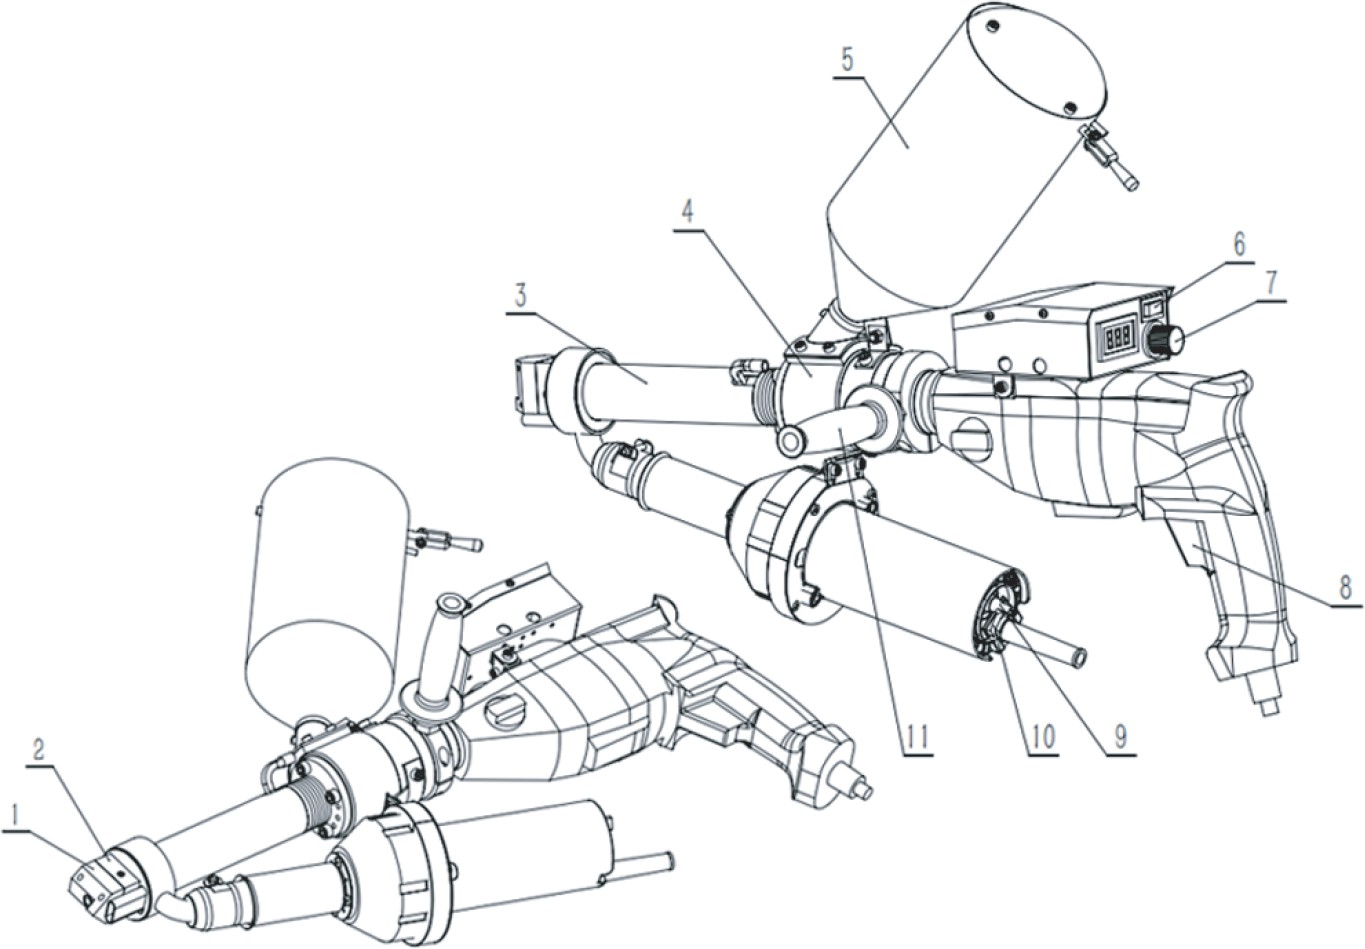
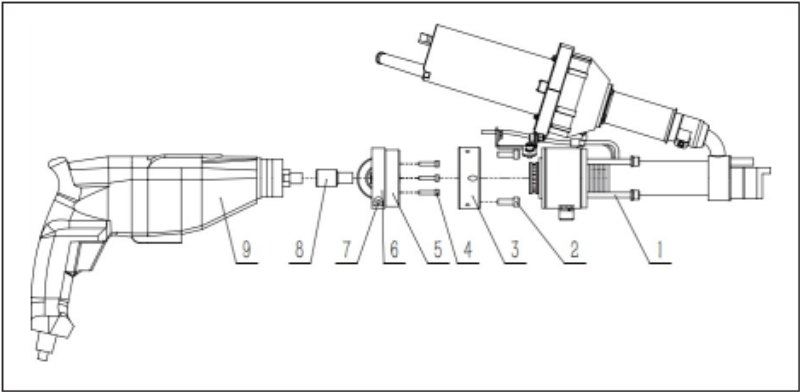
Main Parts

1、Hot Air Blower Power Switch 2、Hot Air Blower Potentiometer
3、Welding Shoe Aluminum Base 4、Welding Shoe
5、Hot Air Scooper 6、Temperature Storage Tube
7、Flange 8、Handle
9、Drive Motor Switch 10、Welding Rod Feeding Inlet
Single Heating Extrusion Welder Operating Steps
◆ Power on
1、Plug in
2、Turn on the hot air blower power switch
3、Rotate the hot air blower potentiometer to position 6-7
4、After waiting for 9 minutes to complete the preheating, prepare to insert the welding rod
◆ Preparation before welding
1、Clean the welding rod surface and insert it into the feeding inlet
2、Press the drive motor switch ( short contact 2-3 seconds). After repeating 2-3 times,
confirm the sound of the drive motor is normal and the speed of welding rod extrusion is
smooth(Extend the heating time if the sound is abnormal or welding rod is not extruded)
3、The extruded welding rod is not soft or hard, and the smooth surface luster is the
best extruding effect
4、Start Welding
◆ Notes for welding process
1、If the sound of the drive motor suddenly changes or the welding rod is stuck without
feeding, it is necessary to immediately loosen the drive motor switch and check whether
the heating temperature is normal
2、In the case of no welding rod feeding in, immediately release the drive motor switch.
Do not start the drive motor without welding rod
◆ Turn off steps
1、The plastic in the extruder must be cleaned before the machine is turned off so as not to
cause blockage and damage the extruder next time
2、After cleaning plastic, set the hot air blower potentiometer to 0 and cool it down
3、Turn off the hot air blower power switch
4、Cut off the power
Granules Extrusion Welder
| Model | LST620 |
| Rated Voltage | 230 V |
| Frequency | 50 / 60 Hz |
| Extruding Motor Power | 1300 W |
| Hot Air Power | 1600 W |
| Granules Heating Power | 800 W |
| Air Temperature | 20 - 620℃ Adjustable |
| Plastic Extruding Temperature | 50 - 380℃ Adjustable |
| Extruding Volume | 2.0-3.5 kg/h |
| Net Weight | 8.0 Kg |
| Driving Motor | METABO |
| Certificate | CE |
| Warranty | 1 year |
1、Welding Shoe 2、Welding Shoe Aluminum Base 3、Temperature Storage Tube 4、Flange 5、Hooper 6、Control Box Power Switch
7、Control Box Temperature Adjust Knob 8 、 Drive Motor Switch 9、Hot Air Blower Potentiometer 10、Hot Air Blower Power Switch 11、Handle
Granules Extrusion Welder Operating Steps
◆ Power on
1、Plug in
2、Press the control box power switch and rotate the control box temperature adjust knob
to 320-350℃ (Digital Display)
3、When the digital display temperature reaches setting temperature, delay 180 seconds
before starting the drive motor (Cold Start Protection)
◆ Preparation before welding
1、Turn on the hot air blower power switch, rotate the hot air blower potentiometer to
position 6-7
2、Pour plastic granules into the hooper
3、Press the drive motor switch and press the self-locking button, Confirm the sound of
the drive motor is normal and the speed of granules extrusion is smooth(Extend the
heating time if the sound is abnormal or granules is not extruded)
4、The extruded granules is not soft or hard, and the smooth surface luster is the best
extruding effect
5、Start Welding
◆ Notes for welding process
1、If the sound of the drive motor suddenly changes or the granules is stuck without feeding,
it is necessary to immediately loosen the drive motor switch and check whether the heating
temperature is normal
2、In the case of no granules feeding in, immediately release the drive motor switch. Do not
start the drive motor without granules
◆ Turn off steps
1、The plastic in the extruder must be cleaned before the machine is turned off so as not to
cause blockage and damage the extruder next time
2、After cleaning plastic, set the hot air blower potentiometer to 0 and cool it down
3、Turn off the hot air blower power switch
4、Turn off the control box power switch
5、Cut off the power
Replacement of Welding Shoe

Scalding danger

Work only with heat-proof gloves

Turn off equipment and power off
Remove
1、Remove the welding shoe with base from the extruder nozzle by loosening the tightening
screws (1)
2、For each replacement, the residue in the welding shoe must be cleaned and the
extruder nozzle must be tightened
3、Remove the welding shoe PTFE (4) from the welding shoe aluminum base (3) by loosening
fastening screws (2)
· Assembly
1、Use the fastening screws (2) to install a welding shoe PTFE (4) on welding shoe
aluminum base (3)
2、Welding shoe PTFE (4) must be tightened with fastening screws (2) and tightening
screws (1)
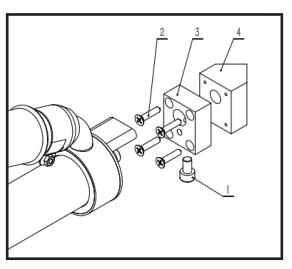
1. Tightening Screws
2. Fastening Screws
3. Welding Shoe Aluminum Base
4. Welding Shoe PTFE
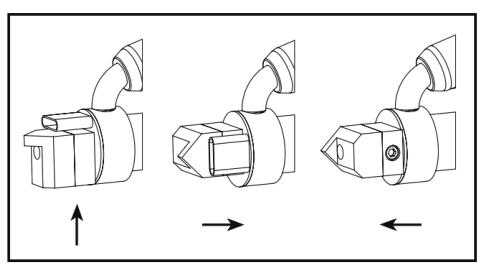
Direction of Welding Shoe
By loosening the tightening screws, the
welding shoe can be rotated to the
required welding direction.
The tightening screws must be retightened.
Replacement of Heating Element
1、Hot Air Blower Connector 2、Long Hex Socket Screw 3、Hot Air Blower Bracket 4、Long Hex socket Screw 5、Hot Air Blower 6、Long Philips Screw 7、Air Duct 8、High Temperature Gasket 9 、 Heating Element 10、Outer Cover
Remove
· Assembly
Loosen the long hex socket screw (2) on the hot air blower connector (1) and the long hex
socket screw (4) on the hot air blower bracket (3) to remove the hot air blower (5) from the
plastic extrusion welder
Loosen the long Phillips screw (6) of the hot air blower and remove the air duct (7) and the
high temperature gasket (8) from the outer cover (10)
Slowly remove the heating element (9) from the outer cover (10)
Install the new heating element (9) in the outer cover (10)
Cover the high temperature gasket (8) and air duct (7) in order and lock them with the
long philips screw (6)
Install the hot air blower (5) in the plastic extrusion welder and fix it with the tighten long
hex socket screw(2) and the long hex socket screw (4)
Replacement of Drive Motor
1、Fastening Bolt (A) 2、Fastening Bolt (B) 3、Thrust Bearing Seat 4、Fastening Bolt (C) 5、Drive Motor Connecting Seat 6、Handle Fixing Ring 7、Fastening Bolt (D) 8、Connecting Nut 9、Drive Motor
Remove
Loosen the fastening bolt (A) (1), remove the thrust bearing seat (3) and the
drive motor (9) in order
Loosen the fastening bolt (B)(2) and remove the thrust bearing seat (3) from the drive
motor connecting seat (5)
Once loosening fastening bolt (C) (4) and fastening bolt (D) (7), remove the connecting
seat (5) of the drive motor (9) and the handle fixing ring (6) from the drive motor (9)
Loosen the connecting nut (8) and remove the drive motor (9)
·Assembly
Screw the connecting nut (8) to the new drive motor (9)
Using fastening bolt(C)(4) and fastening bolt(D)(7) to fix the connecting seat (5) and
handle fixing ring (6) to the drive motor (9)
Using fastening bolt (B)(2) to fix the thrust bearing seat (3) to the connecting
seat (5)
Install and fix the thrust bearing seat (3) and drive motor (9) by using fastening bolt (A)(1)
Fault Code
|
Model |
Fault Phenomenon |
Fault Checking |
| LST610A/B/C/E LST600A/B/C/E/F |
Plug in without any action |
Check whether the input power supply and power cord are in good
condition |
|
LST610A/B/C LST600A/B/C LST620 |
Hot air blower is working properly but
control box display is off |
Check control box switch Check fuse of control box
Check high-voltage protective varistor |
|
LST610A/B/C/E/F LST600A/B/C/E/F LST620 |
Hot air blower does not work but control box is working properly |
Check whether the connection between the hot air blower and the control box is in good condition Check whether the hot air blower power switch is damaged Check whether the carbon brush of hot air blower motor is depleted Check whether the motor is burned out |
|
LST610A/B/C/E/F LST600A/B/C/E/F LST620 |
Hot air blower does not heat up |
Check whether the heating element is damaged
Check whether the potentiometer of air blower is damaged |
|
LST610A/B/C LST600A/B/C LST620 |
The control box appears ok but can not heat up |
Check whether the spring heating coil is damaged |
| LST610A/B/C/E LST620 | The drive motor fault lamp flashes slowly | The motor carbon brush is depleted and the carbon brush needs to be replaced. |
|
Model |
Fault Phenomenon |
Fault Checking |
|
LST610A/B/C/E LST620 |
The drive motor fault lamp flashes fastly |
The power supply is in poor contact or the power cord is damaged |
| LST610A/B/C/E LST620 | The drive motor fault lamp keeps on |
Drive motor overtemperature problem |
|
LST610A/C LST600A/C LST620 |
Error code ER1 |
The spring heating coil thermocou- ple has problem |
|
LST610A/B/C LST600A/B/C LST620 |
Error code ER2 |
The spring heating coil is overtem- perature |
|
LST600A/B/C LST620 |
Error code ER3 |
Drive motor overtemperature problem |
|
LST600A/B/C LST620 |
Error code ER4 |
The drive motor thermocouple has problem |
Maintenance
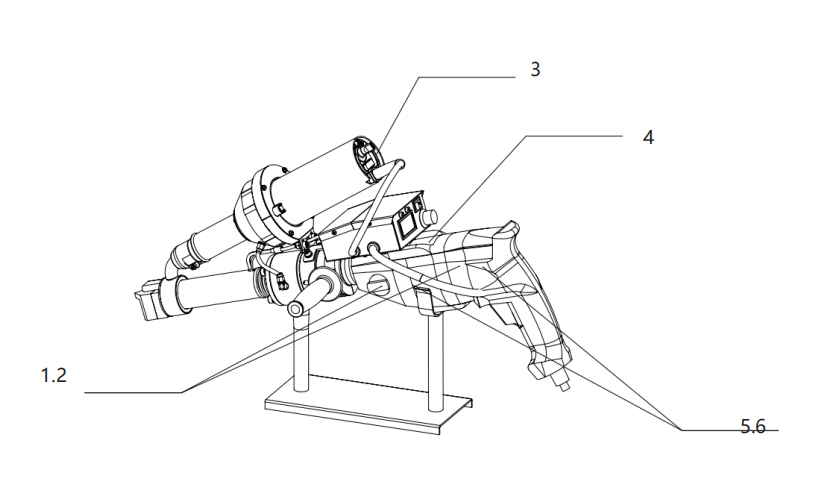
1.2The knob is strictly prohibited to touch
3.Air filter are cleaned regularly to prevent clogging
4.4-5 gears are recommended
5.6.Air filter are cleaned regularly to prevent clogging
· The air filter should be cleaned with a brush when soiled
· For each replacement of welding shoe, clean the extruder nozzle and remove welding
residue
· Check power connection and plug for breakage or mechanical damage
· The air duct should be cleaned regularly
· Repairs can only be carried out by professional Lesite service station to ensure professional
and reliable maintenance service within 24 hours according to circuit diagram and spare parts
list
Warranty
· This product guarantees a 12-month liability period from the day it is sold to consumers.
We will be responsible for failures caused by material or manufacturing defects. We
will repair or replace defective parts at our sole discretion to meet the warranty
requirements.
· The quality assurance does not include damage to wearing parts (heating elements,
carbon brushes, bearings, etc.), damage or defects caused by improper handling or
maintenance, and damage caused by falling products. Irregular use and unauthorized
modification should not be covered by the warranty.
Maintenance
· It is strongly recommended to send the product to Lesite company or
authorized repair center for professional inspection and repair.
· Only original Lesite spare parts are allowed.